As you already know we released Hard Disk Manager for Mac to cover most of necessary tasks related to Disk management and data protection.
In this article we will introduce you to HDM for Mac interface and its main functions (short explanation of what each function does with link to dedicated article).
Don’t forget that to fully install HDM for Mac you need to drag and drop HDM for Mac in applications after launching .dmg file.
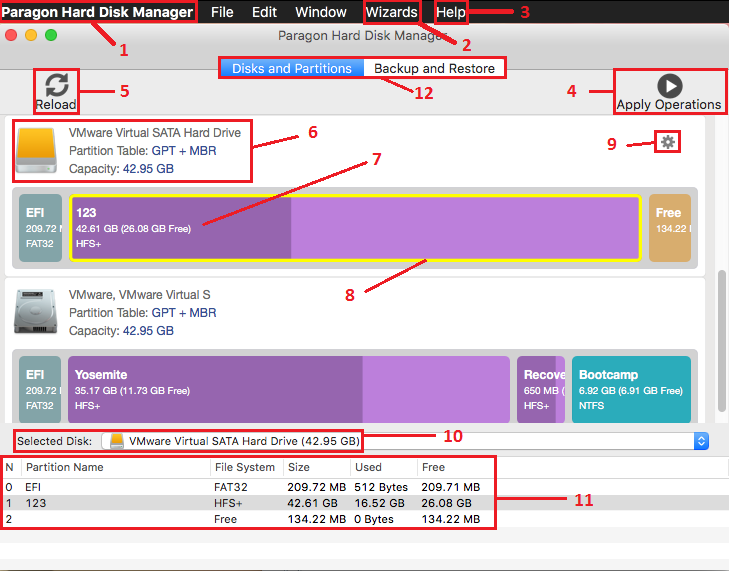
Here is a screenshots of opened Hard Disk Manager for Mac Window on Disks and Partitions tab and Backup and Restore tab.

– By pressing About Paragon Hard Disk Manager you can find out information on installed version.
– Check for update – program checks if there is newer version available for installation.
– License – opens activation menu. You can check your license status here and activate your trial by providing serial number of purchased license.
– Preferences window has two main tabs: HDM settings
and Themes
There are two Wizards included in HDM for Mac
– Redistribute Free Space Wizard allows to redistribute not used space between two neighbouring partitions.
You can find out what problems Wizard encountered by pressing “?” button.
How to work with this Wizard is covered in this article.
– Create Bootable Recovery Media allows you to create recovery media with which you can boot with to perform certain operations and in case your Mac is not starting up. You can read more information on Recovery Media Creation in this article.
Here you can find Logs Saver with which you can collect logs for Paragon support team. You can find details here.
By default all operations are performed in Virtual mode first so you can check that you did everything right. After that you press this button and get to Apply operations menu where you can undo operations starting from last/undo all or apply operations physically.
By pressing this button you can reload disk map if you attached device after launching HDM or you performed some changes with Disk Utility while HDM was started and you want to see this changes in HDM)
Label, Full size and free space, File system type (Colour depends on interface Theme that you selected in Preferences->Themes menu)
When you place mouse cursor on Disk or Partition this button appears and by pressing this button you can access operation available for this element (you can access this functions also by right clicking on element).
By selecting disk here you can see all detailed information on this disk’s Volumes
You can also access operations available for this Volume by right clicking on item that you need.
in this field you can find list of all backup that you performed or added to this list.
by pressing this button you will start creating new backup.
You can find more information in this dedicated article – [How to] Create backup archive in Hard Disk Manager for Mac
Also you can find information about Core Storage configuration backup and restore in this article – Backup and Restore Core Storage configuration with HDM for Mac
this button becomes active only after you selected archive that you want to restore.
After you selected archive you can create increment to this (parent) archive. Increment backup will contain all changes that happened after you created parent backup. First increment taken from parent archive is in fact a differential backup. You can select 1st increment (differential) as parent – this way you will start increment backup chain.
Good thing about always using 1st full backup as parent – for restore you need only full backup and 1st increment (differential). Bad thing – if you always select full backup as parent then backups will become bigger and bigger.
If you use increment chain (select previous increment as parent instead of full backup) then this backup is created quickly and takes small amount of space, however you need all bits of chain intact to restore such backup to newest archive and restore will take considerable amount of time.
after selecting archive from the list you can mount it and navigate it as if it was an external drive.
If your archives take too much space or your incremental chain is too long and you don’t need old backups – you can merge newer increments with older ones (updating information in them)
by pressing this button selected archive will be immediately deleted without any confirmation.
by pressing “+” button finder window will open and you can navigate to archive file to add it to the list of archives
by pressing “-” button you can delete archive from the list, you can either remove archive from list alone or move archive file to trash at same time.
After selecting archive you will see it’s details in this field.
Hard Disk Manager for Mac, Products for Mac OS X


 (No Ratings Yet)
Enter your email and receive updates
about special offers and exclusive content!
Enter your email and receive updates
about special offers and exclusive content!

