How to Copy Hard Disk
You can clone a hard disk of any file system. During the hard disk copying process, the program moves controlling records of used partitioning scheme, the bootstrap code and on-disk partitions. That’s why this operation cannot be substituted by simply copying all on-disk partitions.
Note! You need at least two hard disks to carry out this operation.
Startup
Select Copy & Migration > Copy Hard Disk in Full Scale Launcher or Copy Hard Disk in Express Launcher
Setup
The wizard offers the following steps to accomplish the copy hard disk operation:
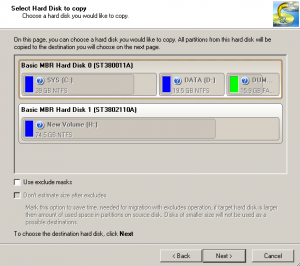
– The hard disk to copy. Select a hard disk you want to copy.

- Use exclude masks. By default the program doesn’t take into account exclude filters set in the Settings dialog. If you need to use them, please mark the checkbox and see existing/specify additional filters on the next page of the wizard.
- Don’t estimate size after excludes. You can save time by suppressing calculation of the resulted amount of data to copy after using excludes. Please note however, if you use this option, drives that smaller in size than the source disk will be unavailable to use as destination.
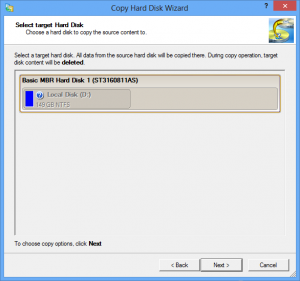
– The target hard disk. Select a hard disk (if several) where all data of the source disk will be copied to.

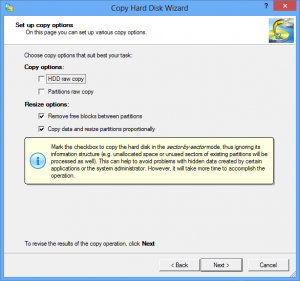
– Copy parameters. The wizard enables to specify the following options:

- Copy options
– HDD raw copy to copy the hard disk in the sector-by-sector mode, thus ignoring its information structure (e.g. unallocated space or unused sectors of existing partitions will be processed as well). This can help to avoid problems with hidden data created by certain applications or the system administrator. However, it will take more time to accomplish the operation.
– Partition raw copy to copy the on-disk partitions in the sector-by-sector mode to successfully process unknown file systems. However it is not recommended to enable this option when working with supported file systems as it takes more time to accomplish the operation.
– Switch EFI to boot from destination drive. If you’ve got to do with a 64-bit Windows configured to the uEFI boot mode, the following option will become available for you to define what instance of Windows OS you’d like to boot from once the operation is over. Anyway you can specify a bootable device at any time through Boot Corrector.
- Resize options
– Remove free blocks between partitions not to keep blocks of free space between partitions on the targeted hard disk.
– Copy data and resize partitions proportionally to make the program proportionally change the size of partitions keeping their relative order intact. The option can be useful when upgrading the hard disk to a larger one.
Note! The ‘Switch EFI to boot from destination drive’ option becomes available, only if the following conditions are met:
- The operation is accomplished through the 64-bit WinPE media;
- As a result of the operation the target disk becomes Bootable GPT.
Result
After the operation is completed, you receive a fully functional duplicate of the existing hard disk.
Backup & Recovery, Drive Copy, Hard Disk Manager™ for Windows, HowTos: Paragon, Know how: Paragon
Tags: howto, windows, WinPE

Loading...